Note: This article has been updated with lastest available information on January 13th, 2022 at 04:50 pm
This project extends the functionality of the PGSparkLite web interface (https://github.com/richtamblyn/PGSparkLite) to allow control of a Positive Grid Spark 40 amp using physical footswitches, expression pedal, On/Off status LEDs and supports an OLED or LCD display.
The PGSparkLite Pedal requires a brain. In this case, a Raspberry Pi Zero W and the PGSparkLite web interface installed. Follow the instructions here (if you haven't already) - https://github.com/richtamblyn/PGSparkLite/wiki/How-to-setup-a-Raspberry-Pi-Zero-W-and-PGSparkLite-from-scratch
The Pedal software is currently at version 2 and is supported by both versions of hardware. The differences between the hardware is explained below;
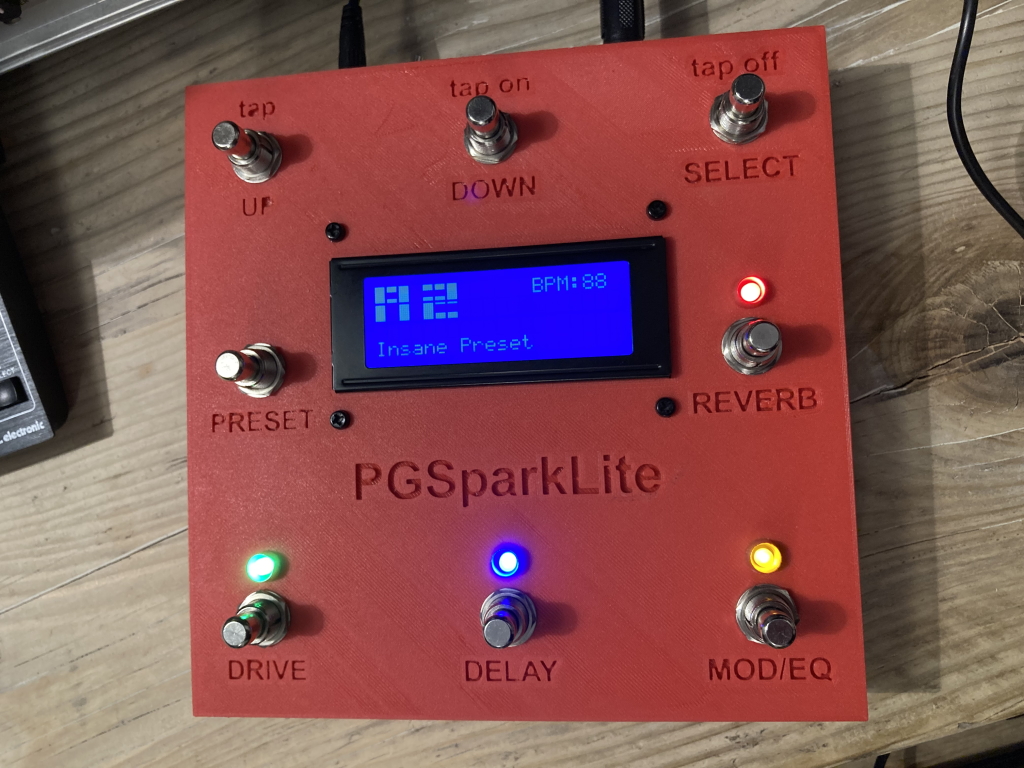
- Amp Preset selection footswitches - Use Up/Down switches to move through amp presets 1-4 and hit Select switch to change.
- Dedicated Drive Pedal On/Off footswitch and LED indicator
- Dedicated Delay Pedal On/Off footswitch and LED indicator
- Dedicated Modulation Pedal On/Off footswitch and LED indicator
- Press Up footswitch for 2 seconds to cycle between User and Amp presets.
- Press the Modulation Pedal footswitch for 5 seconds to nicely shutdown the pedal.
- OLED Display - Shows status messages and selected Amp/User Preset
- Press Down footswitch for 2 seconds to change to Tap Tempo mode. Tap Up footswitch to set tempo. Tap Select footswitch to send new tempo to the Amp.
Hardware recommendations and wiring guide for Version 1 hardware can be found here -> https://github.com/richtamblyn/PGSparkLite-Pedal/wiki/Hardware-Recommendations-and-Wiring-Guide-(Hardware-Version-1)
As above with the following additional features;
- Dedicated Reverb Pedal On/Off footswitch and LED indicator
- Preset footswitch to switch between Amp and User presets quickly
- LCD Display - Shows status messages and selected Amp/User Preset, Preset Name and delay BPM.
Hardware recommendations and wiring guide for Version 2 hardware can be found here -> https://github.com/richtamblyn/PGSparkLite-Pedal/wiki/Hardware-Recommendations-and-Wiring-Guide-(Hardware-Version-2)
The software installation for PGSparkLite Pedal is documented in the Wiki here - https://github.com/richtamblyn/PGSparkLite-Pedal/wiki/How-to-install-and-configure-PGSparkLite-Pedal-software
Finally, once you've got your pedal built and the software configured, a user guide for it all can be found here;
Version 1 Hardware - https://github.com/richtamblyn/PGSparkLite-Pedal/wiki/PGSparkLite-Pedal-User-Guide-(Hardware-Version-1)
Version 2 Hardware - https://github.com/richtamblyn/PGSparkLite-Pedal/wiki/PGSparkLite-Pedal-User-Guide-(Hardware-Version-2)
Want to get even more out of your PGSparkLite-Pedal? Here's some additional things you can do:
The PGSparkLite web interface and PGSparkLite-Pedal code take the place of the official Positive Grid mobile app.
They allow the user to communicate with their Spark 40 amp via a web browser over WiFi or using physical footswitches attached to the GPIO of the Raspberry Pi Zero W host. Regardless of how it receives a message, PGSparkLite communicates to the amp using BlueTooth.

See the Issues for what could be added next...
More information on the PGSparkLite Pedal Github page
Leave A Comment?